
The COVID-19 epidemic led many churches to rethink how they approached worship. Livestreaming quickly became an invaluable tool allowing services to reach those who could not attend in person. Even now it remains a powerful way to expand your ministry beyond the walls of your building. From members worshiping at home to visitors tuning in from across the globe, livestreaming helps churches stay connected.
The good news is you do not need to spend thousands of dollars to get started. OBS Studio is a free and powerful tool that many churches use to livestream worship. If you are new to OBS Studio do not worry, we will walk through the basics together.
What is OBS Studio and why should churches use it?
OBS (Open Broadcaster Software) Studio is a free app for Windows and MacOS that lets you combine video and audio sources - like a camera, a microphone and even presentation slides - into one broadcast. You can stream that feed live to platforms like YouTube or Facebook and also record it for later.
What makes OBS helpful for churches is its flexibility. Whether you are using a laptop webcam set up in the front row or multiple broadcast-ready cameras throughout the sanctuary, OBS helps you present a clear and professional-looking stream.
Step-by-Step: Getting your church online with OBS
1. Install OBS Studio
Go to obsproject.com and download OBS for your computer. The site will detect whether you’re using Windows, Mac or Linux. Once installed, open it up.
When OBS launches for the first time, it will ask if you want to run the Auto-Configuration Wizard. Say yes.
Choose Optimize for streaming, recording is secondary.

Next, set the Canvas resolution (1920x1080 is standard), and Framerate (30 is recommended).

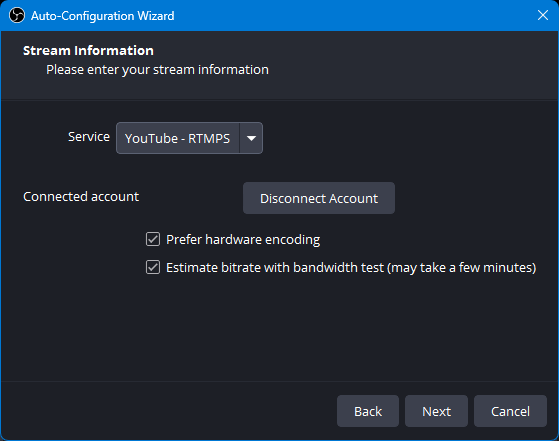
Then, set your desired streaming service: YouTube, Facebook, etc.
Make sure Prefer hardware encoding is checked, as well as Estimate bitrate with bandwidth test and click Next.
The bandwidth test will check the OBS settings to ensure a consistent streaming experience and provide the test results
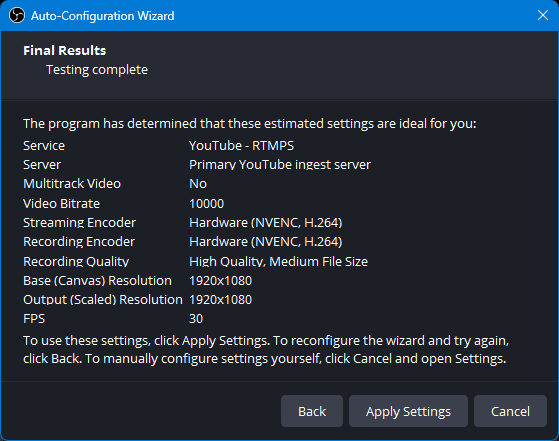
If you need to adjust, click Back and change the settings as needed. Otherwise, click Apply Settings.
If you need to run the setup process again, go to Tools → Auto-Configuration Wizard in the main menu bar.
2. Add your camera and microphone

At the bottom of the OBS window, you’ll see a box labeled Scenes. Think of a scene as a layout. For example, a full-screen camera view could be one scene, and slides with a small camera window in the corner could be another.
Start by creating a scene and name it something like Worship Service.
Then go to the Sources box next to it. Click the little + button and choose Video Capture Device to add your camera. OBS will ask which camera to use - pick the one plugged into your computer. You should see the live camera feed appear.

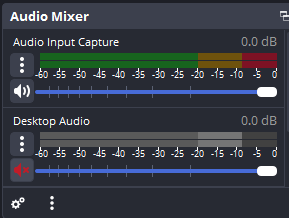
Next, make sure OBS is using the right microphone. Click Settings → Audio and choose your mic or audio interface under “Mic/Auxiliary Audio.” (If you’re feeding sound from your church’s soundboard, that’s where you’d select it.)
Check the Audio Mixer in the main window - you’ll see a volume bar bounce as sound comes in. Aim for the sound to peak around -10 dB.
Make sure to disable desktop audio by clicking on the speaker icon unless you have a specific reason for keeping it enabled – this will prevent system audio from being heard during the stream. The speaker icon will turn red with an X when it is successfully disabled.
3. Add optional extras (slides, logos, videos)
Want to show lyrics or Bible verses during your stream? You can capture your slides with either a Window Capture (for just one program like PowerPoint) or Display Capture (to show your whole screen).
You can also drag in your church logo as an image or preload a welcome video that plays before the service begins.
If you’re feeling ambitious later, you can create different scenes. For example:
- One for the sermon (just the preacher)
- One for the worship team with lyrics on screen
- One for announcements
You can switch between them live during the stream by selecting the desired Scene in OBS.
4. Connect OBS to your streaming platform
If you didn’t connect your streaming platform during the Auto-Configuration Wizard process, you may connect it now.
In OBS, click Settings → Stream. Choose your streaming platform (YouTube, Facebook, etc.). Then, log in or paste in your Stream Key - this is a secret code that is provided by the streaming platform when you set up the streaming event. You’ll find it on the dashboard where you schedule or start a livestream - this connects OBS to your live feed.
5. Test before going live
Before Sunday, do a full test. Record a short clip by clicking Start Recording, then watch it to check audio, video, and sync. Adjust as needed - maybe raise the mic volume or improve the lighting.
If possible, test a livestream as well (you can set it to "Unlisted" on YouTube if you don’t want the public to see the test).
Going live on Sunday
Once you’re confident everything works:
- Open OBS and load your worship scene.
- Click Start Streaming.
- Confirm the stream is live on YouTube, Facebook, or whatever platform you’re using.
- When the service ends, click Stop Streaming.
Tips for best results
- Use a tripod or stable camera mount to avoid shaky footage.
- Use your church’s soundboard audio rather than the camera microphone for the best audio.
- Have someone on a second device (phone, tablet, etc.) watching the stream to catch issues.
- Use a wired internet connection if possible; wi-fi can be unreliable, particularly during church services where you have many devices competing for bandwidth.
A final word
Livestreaming your worship service isn’t just a tech project - it’s ministry. OBS Studio gives your church the ability to reach people where they are, using equipment you likely already have or can get affordably.
Start simple. One camera, one microphone, one platform. As your team gets more comfortable, you can add polish with better layouts, multiple cameras, or lyrics overlays.
Click here to download our OBS Studio livestream checklist
As the founder of 3NV7 Digital, Lane Denson specializes in web development, online media, and digital strategy. He previously held the role of Senior Manager of Web Development at United Methodist Communications. You can reach him at[email protected]